The Mirabal Family Blog...

... keeping the internet up to date on the things we like to ramble about: Our kids, cooking, lives, and much more.


Google
 

Wednesday, January 27, 2010

Calzones and Pizza, yummy real food

I decided to try making calzones for dinner this evening using a new recipe for the dough. The boys did not care for my choices of fillings, so we had calzones AND pizza. I have never made calzones, and was expecting it to be difficult. Much to my surprise, it was easy!!!

Pizza Dough
1.333C Flat Beer (I used Yuengling)
17.8 oz by weight of Organic All Purpose Flour
3 TBS sugar
1.5 tsp salt
1.5 TBS butter
1.5 tsp active dry yeast (OR use 2 tsp instant yeast)

I did not have flat beer, so I made it by pouring a half glass out into a large mug and then pouring the beer from glass to glass until the bubbles stopped. I poured the beer out into a measuring cup and trashed any foam that remained. I did not have quite 1.33C of beer from my 1 bottle of beer after this process so I used a little water to make up the rest of the liquid.

I used a bread machines dough cycle to knead the dough. When the dough is done mixing and rising, pour out the dough and cut it into 4 equal pieces (each piece should weigh about 8oz) and form into a ball. Store the unused portions in a plastic bag to prevent the dough from developing a yucky skin.

This make four 10-12" pizza dough balls or dough for four calzones.

Calzone
1 dough ball
olive oil for brushing the top
.25 - .5C ricotta
.25-.5C mozzarella
Shredded Parmesan cheese to taste
toppings

1. Flatten out a ball of dough into an oval, or 10-12" circle, or whatever... shape is not very important. It's more important that the dough be stretched to an even thickness than uniform shape, since you are going to fold it over and crimp the edges to seal it.

2. Place ricotta (~.25-.5C) on half of the dough, be sure to leave enough room from the edge of the dough to allow it to seal properly

3. Add any toppings... I used cooked brocolli, a handful of mozzarella, some shredded Parmesan, and a sprinkling of basil. Don't over stuff...

4. Fold over the dough and pinch the edges together.

5. Cut 2 lines in the top of the calzone for venting. Brush the top with olive oil and sprinkle the top of the calzone with Parmesan cheese.

6. Bake the calzone on a pizza stone at 400 degrees for 20-25 minutes. If you don't have a pizza stone, bake it on the bottom rack of your oven.


Pizza
1 dough ball
Tomato sauce
up to 8oz of Mozarella Cheese

Preheat your oven to 450 degrees and allow your pizza stone to preheat sufficiently.

Roll out the dough to a 10-12" circle.

If you want, brush the dough with olive oil. Ladle out your desired amount of sauce and spread evenly. Sprinkle the mozzarella cheese evenly over the pizza. Place the pizza on the stone and let it cook 5-10 minutes until the crust is done and the cheese is nice and bubbly. Remove, slice, and enjoy!
Tuesday, January 26, 2010

Yummy whole wheat bread

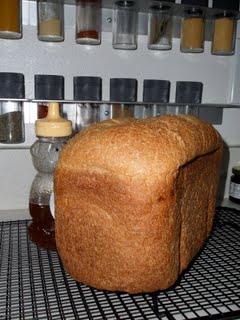
My parents got me a Zojiroshi bread machine for Christmas and I have been using it quite a bit to make delicious whole wheat breads out of the Hard Spring White Wheat I grind fresh using a grain mill (Nutrimill). The fresh flour makes bread that tastes soooo much better than older flour. Today I made my staple 1.5# loaf and it got such great oven spring I had to take a picture (It is almost as tall as my honey bear!) , plus I wanted to pass on the recipe.

The Urban Homemaker website has a great recipe for bread and the version I use for the Zo is below. I weigh all my ingredients so what I list below is the weights I use


Marilyn's Famous Whole Wheat Bread Recipe (1.5# loaf for a bread machine)

(from http://articles.urbanhomemaker.com/index.php?article=450)

11.45 oz by weight water
0.95 oz by weight vinegar
16 oz by weight Fresh whole wheat flour
1.85 oz by weight Local Honey
1.5 oz by weight vital wheat gluten
2 TBS of butter
1.5tsp salt
1.5 tsp yeast

1. Let the machine mix the 1st 3 ingredients for 3 minutes then cover and let the flour soak for up to 24 hours
2. Melt the butter with the honey and pour over the pre-mixed flour
3. Add the gluten on top, place the yeast on the gluten to keep it from getting wet and add the salt off to the side.
4. Run the machine


I use the programmable function of the Zo as follows
Preheat: 30 minutes
Knead: 24 minutes
Rise 1: 45 minutes
Rise 2: 1 hour 25 minutes
Rise 3: Off
Bake: 1 hour 10 minutes
Keep warm: 1 hour

The result absolutely yummy bread!

Monday, January 25, 2010

Chocolate Pudding with a secret ingredient

I was not planning on posting again today, however I just made a healthy, tasty chocolate pudding and had to share. Last week at I picked up 2 local Florida avocados and today I noticed they were finally ripe. So I made pudding. Yup. Chocolate Pudding with 'hidden' avocados. This recipe is dairy and gluten free. Quick to make and requires no cooking. Plus it is yummy with its rich dark chocolate flavor!


Chocolate Pudding


1/2C dates pitted and chopped (this turned out to be 10 dates for me)
1/2C+2TBS boiling water
1/3C Real Maple Syrup
2 large Florida Avocados
3/4C cocoa powder
2TBS Coconut oil, melted
1 TBS (+ a little) local honey

Combine the dates and boiling water in a small bowl and allow to soak a minimum of 4 hours (overnight works). After they are done soaking, place the dates with the soaking water and the maple syrup in the food processor and blend until smooth. Add the avocados, cocoa powder and coconut oil to the food processor and process until smooth. Taste and if you want it a little sweeter add the honey to the mix while the processor is running. If you want to adjust the consistency, add water as needed. Pour the pudding into serving dishes and chill until set. Serves 4-6. (You could probably sub local honey for the maple syrup if you wanted to... the ingredients and quantities listed in the recipe are what I used).

Sunday, January 24, 2010

The Origins of Craftiness

I have always loved crafts of all sorts. Grossmama, my grandma from my mom's side shown in the picture, taught me to crochet and knit the 'proper' way when I was very little and I have created things ever since. For the longest time, I was forever buying lovely yarns and creating various knit and crocheted items... you name it I probably either made one or have a pattern for one. LOL!

My Grandma, dad's side, taught me some sewing during my summer visits in Alabama, enough to be dangerous. Hehe. So as an adult I finally decided that I wanted to sew some things to give away for Christmas. So off to JoAnn's I went and ended up buying a basic Huskaverna Viking machine. It was perfect and I made a bunch of rice bags and gave them to everyone at church. I started sewing enough that I wanted a better machine.

This began my trade-in journey. Machine 1 = basic sewing machine. Machine 2 = Best sewing machine. Machine 3 = Basic Embroidery machine. Machine 4 = Top of the line Embroidery machine. Fun stuff! I am convinced that Viking has the trade-in program solely for the purpose of keeping you spending money in small enough increments that you don't realize you have spent a LOT over time. They let you trade in for another machine and will credit you the full price you paid for the first machine... as long as you do it within their time frame. And this can be repeated each time you upgrade.

So now I had the top of the line machine, the trade in scheme could stop. Right? Kinda... no more trading in machines for me. Even when they came out with the NEW top of the line fancy machine I was perfectly happy with mine since it was still AWESOME. Another 6 months went by and they had a sale. One of those stimulate the economy sales... LOW prices for a great machine. Next thing I know I bought the fancy machine (Machine #5) and am now the proud owner of 2 embroidery machines. :-) I love them and have enjoyed sewing and learning new skills.

For instance, I have been quilting, making bag holders, aprons, and many other things. I think I may even put a few things on ETSY.com and see how they do on that site. While my machines can be seen as crazy excess, I use them a lot and enjoy creating.

I am thankful that Grossmama taught me to knit and crochet, it instilled a love of crafts and creating that is very much part of who I am today! I hope I will be able to pass on the skills I have to the boys one day. Knitting, crocheting, sewing, and cooking are not just skills for girls! I hope they enjoy it as much as I do...

I sure can ramble... more later

... and baby makes 4

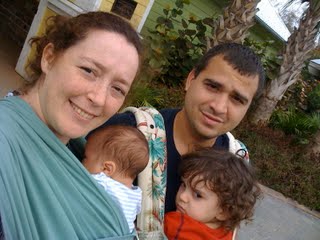
It's been nearly well over a year since I have posted anything to the blog. It is time to start again. :) The year has been good to us... Ethan turned 3 this past Wednesday and Aiden is 10 weeks old now. Yup we are now a family of 4.

Since I have not been blogging, I need to back up a little bit. Last year Erich and I found out we were expecting another little bundle of joy and on November 12, 2009 at 11:18am Aiden was born. He was 8# 5oz and 20 inches long and had an apgar of 9/9. This birth was much easier and laid back than the first one. My doctor was AWESOME and I am pleased to tell everyone that VBACs are completely possible - even un-medicated (Yes I am 'one of those' women who believe in natural childbirth including the unmedicated part. :-P) Aiden was due November 15th so while he was close enough to be considered on time, I was not quite prepared for him to arrive. I had a very big meeting on the 12th that I needed to present for and consequently missed. I also had not quite wrapped up all my work stuff... I was going to do that after my big meeting. Oops. Oh well.

The VBAC started how I wanted, me walking resting and basically doing what ever I wanted. I did this for quite some time until I got tired of not having any regular pattern and decided to sleep instead. Once they finally got around to checking me I was only 3cm dialated. The result? Pitocin. Yuck. Like Ethan, I ended up with pitocin to move labor along, however - unlike Ethan - my contractions started on their own and I was progressing on my own. SLOWLY, but I was progressing. Once I had 'pit' everything sped up and I went from 3cm to 6cm in 3 hours and from 6cm to 10cm in about an hour. Woo hoo! 9 pushes and the little guy was here!

I was able to hold him for a bit before they cleaned him up and even able to nurse a little. He is quite the nursling! Sooooo much different this time around. :-) And, while most will think this is gross, I was able to see the placenta this time. I wanted to see it when I had Ethan, however the doctor said no and threw it away :-( as part of the surgery. I was not in a position to argue with her since I was sick from the anastesia and was in the middle of major abdominal surgery (C-Section). So having this time to see it was much better. It was strange looking. Amazing - that strange thing grew the little one for 40 weeks from a few cells to the beautiful little boy I have.

So this year I plan to get back to blogging. 140 characters on facebook can be limiting. I plan on blogging on some of everything. Of course you will get to hear about my 2 blessings, maybe some of my hubbies antics, my cooking and crafting and generally what ever is on my mind. Erich may be posting his thoughts from time to time as well. :-) Anyway, sorry for the long break and this marks the first post of the new year!

Labels: